Hey fellas, you’re reading part 2 of Build your AWS infrastructure. In part 1, I showed you how I built the basic infrastrucutre from VPC to load balancer and then to ECS cluster. Since we’ve got the foundation by now, let’s start building applications!
Overview
Here’s an overview of what I did: I built a simple .NET core application, deployed it as a container on ECS and added a Route53 record set pointing to my application load balancer which points to my ECS cluster. Here’s an example: when users type www.disasterdev.net in their browser,the request is forwarded to my load balancer first, and then, based on the path of the request, the ALB (application load balancer) knows how to route the request to the corresponding container. Let’s see how I did all these in details.
Build .NET core application
You probably have heard of .NET core already. Prior to its brith, we could only deploy .NET applications on windows servers (yeah yeah… I there’s Mono). Most importantly, it was very difficult to run .NET applications as containers - now that really sucks. Microsoft knew how important container technology would be, so it rewrote .NET framework from scratch, which is aimed to be cross-platform. Now with .NET core, I can deploy it as containers on Linux, which is huge benefit as now I can easily deploy a .NET core application on AWS cloud!
If you’re a .NET developer, do yourself a favor and start learning .NET core today - I believe it’ll gradually replace traditional .NET applications, and most importantly, you don’t have to worry cross-plat form issue anymore.
I assume you have installed .NET core SDK and runtime. Open terminal, and type
mkdir SampleNetCoreAWS
cd SampleNetCoreAWS
dotnet new web
dotnet restore
dotnet run
Bang! There’s your first .NET core application running on http://localhost:5000 already. Before deploying it to AWS, I did a few changes:
In Program.cs:
public static IWebHost BuildWebHost(string[] args) =>
    WebHost.CreateDefaultBuilder(args)
        .UseKestrel(options =>
        {
            // kestrel listens to port 5000 of any IPs
            options.Listen(IPAddress.Any, int.Parse(Environment.GetEnvironmentVariable("PORT") ?? "5000"));
        })
        .UseStartup<Startup>()
        .Build();
In Startup.cs:
public void Configure(IApplicationBuilder app, IHostingEnvironment env)
{
    if (env.IsDevelopment())
    {
        app.UseDeveloperExceptionPage();
    }

    app.Map("/app/healthcheck", HandleHealthCheck);

    app.Map("/app", HandleApp);
}

private static void HandleApp(IApplicationBuilder app)
{
    app.Run(async context =>
    {
        await context.Response.WriteAsync("Hello world!");
    });
}

private static void HandleHealthCheck(IApplicationBuilder app)
{
    app.Run(async context =>
    {
        await context.Response.WriteAsync("I'm running");
    });
}
Notice that this code was written in the way to fit my scenario only. You can write your own application however you like, but do remember to configure kestrel to listen to IPAddress.Any on port 5000, otherwise you application won’t work, because ECS will have no way to send send traffic to your containers.
Don’t forget to add a Dockerfile to build your image:
FROM microsoft/dotnet:2.0.4-sdk-2.1.3 as builder

COPY . /app
WORKDIR /app
RUN ["dotnet", "restore", "--no-cache"]
RUN dotnet publish -c Release -r linux-x64

FROM microsoft/dotnet:2.0.4-runtime
WORKDIR /app
COPY --from=builder /app/bin/Release/netcoreapp2.0/linux-64/publish .
EXPOSE 5000
ENTRYPOINT ["dotnet", "SampleNetCoreAWS.dll"]
We also need a buildspec.yml, that is for AWS CodeBuild, which we’ll see later.
version: 0.1

phases:
  pre_build:
    commands:
      - echo -n "$CODEBUILD_BUILD_ID" | sed "s/.*:\([[:xdigit:]]\{7\}\).*/\1/" > /tmp/build_id.out
      - printf '{"tag":"%s"}' "$(cat /tmp/build_id.out)" > build.json
      - echo Logging in to Amazon ECR
      - $(aws ecr get-login --region $AWS_DEFAULT_REGION --no-include-email)
  build:
    commands:
      - echo Build started on `date` for $ASPNETCORE_ENVIRONMENT
      - docker build --tag "$REPOSITORY_URI:$(cat /tmp/build_id.out)" .
  post_build:
    commands:
      - echo Build completed on `date`
      - echo Pushing the Docker image...
      - docker push "$REPOSITORY_URI:$(cat /tmp/build_id.out)"
artifacts:
  files:
    - build.json
    - cfn/**/*
Deployment
To run a container on ECS, we need to define an ECS service, for which we need to define a task definition. A task definition is like a recipe for cooking a container. It tells ECS how to spin up a container, including what Docker image it should use, how much memory it can allocate to the service, what container port it should deploy to, so on so forth. Once the task defined, ECS will maintain desired number of containers running for the task.
In SampleNetCoreAWS project, I added the cfn/deploy.yml, which contains the task definition as below. By executing this CloudFormation file, an applicatin stack app-sample-netcore will be created or updated if it exists. The idea is that each deployment produces a brand new version of task definition in the form of CloudFormation. We (technically not we, but the build machine) then applies this new task definition to the ECS service. ECS service detects that its task definition has been updated, so it starts to re-run containers based on the lastet task definition including pulling the new container image, spinning up desired number of containers etc. In short, deploy.yml tells AWS how to deploy our sample .NET core application. Here’s the deploy.yml.
AWSTemplateFormatVersion: '2010-09-09'

Description: ECS Service - sample-netcore

Parameters:
  ApplicationName:
    Type: String
    Description: The name of the application we're trying to deploy, which will be
      used for service name and container name etc.
    Default: sample-netcore

  EnvironmentName:
    Type: String
    Description: The runtime environment name for this application, e.g. ASPNETCORE_ENVIRONMENT
      for Dotnet Core, NODE_ENV for Node
    Default: Development

  BaseImageName:
    Type: String
    Description: The docker image name

  EnableHttps:
    Type: String
    Description: Set this to true if you want to encrpyted traffic between ALB and ECS
    Default: false

  ClusterName:
    Type: String
    Description: The name of the ECS cluster where this service is about to be deployed
    Default: ApplicationCluster

  DesiredCount:
    Type: Number
    Description: How many instance of this task should we run across our cluster?
    Default: 1

  Priority:
    Description: Priority to evaluate Path rules
    Type: Number
    MaxValue: 50000
    MinValue: 1
    Default: 1

  ImageTag:
    Type: String
    Description: The docker image tag

  HealthCheckPath:
    Type: String
    Description: Every container must provide a health url for the load balancer to
      test with
    Default: /app/healthcheck

  DeregistrationDelay:
    Type: Number
    Description: The duration (in seconds) ECS waits for before degistrating a container
    Default: 5

  Memory:
    Type: Number
    Description: 'Soft memory limit of this task: the service cannot use memory above
      this number'
    Default: 256

  Path:
    Type: String
    Description: The path to register with the ALB
    Default: /app*

  ContainerPort:
    Type: Number
    Description: The port the load balancer will map traffic to on the container;
      this application should listen to this port as well
    Default: 5000

Conditions:
  httpsEnabled: !Equals
    - !Ref 'EnableHttps'
    - true

Resources:
  Service:
    Type: AWS::ECS::Service
    Properties:
      LoadBalancers:
          - ContainerName: !Ref 'ApplicationName'
            TargetGroupArn: !Ref 'TargetGroup'
            ContainerPort: !Ref 'ContainerPort'
      Cluster: !Ref 'ClusterName'
      Role: !Ref 'ServiceRole'
      TaskDefinition: !Ref 'TaskDefinition'
      DesiredCount: !Ref 'DesiredCount'
    DependsOn: ListenerRule

  ServiceRole:
    Type: AWS::IAM::Role
    Properties:
      Path: /
      Policies:
        - PolicyName: ECSService
          PolicyDocument:
            Version: '2012-10-17'
            Statement:
              - Action:
                  - ec2:AuthorizeSecurityGroupIngress
                  - ec2:Describe*
                  - elasticloadbalancing:DeregisterInstancesFromLoadBalancer
                  - elasticloadbalancing:Describe*
                  - elasticloadbalancing:RegisterInstancesWithLoadBalancer
                  - elasticloadbalancing:DeregisterTargets
                  - elasticloadbalancing:DescribeTargetGroups
                  - elasticloadbalancing:DescribeTargetHealth
                  - elasticloadbalancing:RegisterTargets
                Resource: '*'
                Effect: Allow
      AssumeRolePolicyDocument:
        Statement:
          - Action:
              - sts:AssumeRole
            Effect: Allow
            Principal:
              Service:
                - ecs.amazonaws.com

  TaskRole:
    Type: AWS::IAM::Role
    Properties:
      AssumeRolePolicyDocument:
        Statement:
          - Action: sts:AssumeRole
            Effect: Allow
            Principal:
              Service: ecs-tasks.amazonaws.com

  TaskDefinition:
    Type: AWS::ECS::TaskDefinition
    Properties:
      TaskRoleArn: !GetAtt 'TaskRole.Arn'
      ContainerDefinitions:
        - Environment:
            - Name: ASPNETCORE_ENVIRONMENT
              Value: !Ref 'EnvironmentName'
            - Name: PORT
              Value: !Ref 'ContainerPort'
          Name: !Ref 'ApplicationName'
          Image: !Sub '${BaseImageName}:${ImageTag}'
          PortMappings:
            - ContainerPort: !Ref 'ContainerPort'
          LogConfiguration:
            LogDriver: awslogs
            Options:
              awslogs-group: !Ref 'AWS::StackName'
              awslogs-region: !Ref 'AWS::Region'
          Memory: !Ref 'Memory'
          Essential: true
    DependsOn: CloudWatchLogsGroup

  CloudWatchLogsGroup:
    Type: AWS::Logs::LogGroup
    Properties:
      RetentionInDays: 60
      LogGroupName: !Ref 'AWS::StackName'

  TargetGroup:
    Type: AWS::ElasticLoadBalancingV2::TargetGroup
    Properties:
      HealthyThresholdCount: 2
      HealthCheckIntervalSeconds: 10
      VpcId: !ImportValue 'infra-vpc::VpcId'
      Protocol: !If
        - httpsEnabled
        - HTTPS
        - HTTP
      Matcher:
        HttpCode: 200-299
      HealthCheckPath: !Ref 'HealthCheckPath'
      HealthCheckTimeoutSeconds: 5
      TargetGroupAttributes:
        - Value: !Ref 'DeregistrationDelay'
          Key: deregistration_delay.timeout_seconds
      HealthCheckProtocol: HTTP
      Port: !If
        - httpsEnabled
        - 443
        - 80

  ListenerRule:
    Type: AWS::ElasticLoadBalancingV2::ListenerRule
    Properties:
      Priority: !Ref 'Priority'
      Conditions:
        - Field: path-pattern
          Values:
            - !Ref 'Path'
      Actions:
        - TargetGroupArn: !Ref 'TargetGroup'
          Type: forward
      ListenerArn: !ImportValue infra-alb::LoadBalancerListenerArn
CICD
We’re almost there. I love AWS CodePipeline + CodeBuild because they’re both managed services, which means I don’t need to run and maintain a build server. CodeBuild provides you with an ephemeral build machine where you can run commands to build docker images and push them to ECR. CodePipeline defines your CICD automation process by letting you define different stages where you can pull source code, build it and deploy your applications. For example the diagram below illustrates a way to make your CICD on AWS.
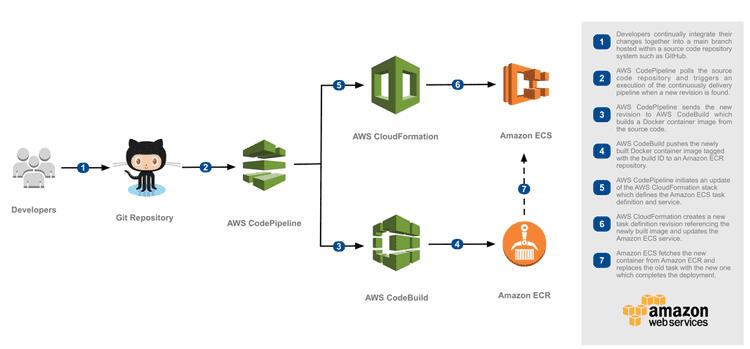
- Developers commit code to GitHub repository.
- CodePipeline polls the source code and passes it to CodeBuild.
- CodeBuild builds a container image based on
buildspec.ymlfile included in the project root, pushes it to ECR. - CodePipeline then runs a CloudFormation template to create a new task definition, and then updates ECS service.
- ECS service is instructed by the new task definition to pull the container image from ECR and starts the containers using that image.
The steps mentioned above is the complete flow of how CICD works using AWS managed tools and services. I find this approach neat and wasy, and heavily use it in my daily work - no build servers to maintain anymore!
Another reason I like this is that - yeah you pretty much have gussed it - you can CloudFormation it! This means I can write a generic CloudFormation template to serve the creation or update of most CICD pipelines. To build a new pipeline, all I need to do is to change a few parameters in the template and deploy it as a new CloudFormation stack. Usually, it only takes less than 1 minute to do so. Even better, I can write a CLI to generate such template and deploy it automatically - all of sudden life is so good already.
Here’s the CICD CloudFormation I used for this sample .NET core application.
---
AWSTemplateFormatVersion: '2010-09-09'

Description: "CICD - ECS Service - sample-netcore"

Parameters:
  ApplicationName:
    Type: String
    Description: "The name of the application we're about to deploy using this CICD"
    Default: "sample-netcore"

  RepoName:
    Type: String
    Description: "The GitHub repository name for this application"
    Default: "SampleNetCoreAWS"

Resources:
  Repository:
    Type: "AWS::ECR::Repository"

  CloudFormationExecutionRole:
    Type: "AWS::IAM::Role"
    Properties:
      Path: "/"
      AssumeRolePolicyDocument:
        Statement:
        - Effect: Allow
          Principal:
            Service:
            - cloudformation.amazonaws.com
          Action:
          - sts:AssumeRole
      Policies:
      - PolicyName: CloudFormationExecutionAccess
        PolicyDocument:
          Version: '2012-10-17'
          Statement:
          - Resource: "*"
            Effect: Allow
            Action:
            - cloudformation:CreateStack
            - cloudformation:DeleteStack
            - cloudformation:DescribeStack*
            - cloudformation:UpdateStack
            - ec2:Describe*
            - ecr:*
            - elasticloadbalancing:*
            - events:DescribeRule
            - events:DeleteRule
            - events:ListRuleNamesByTarget
            - events:ListTargetsByRule
            - events:PutRule
            - events:PutTargets
            - events:RemoveTargets
            - ecs:DescribeServices
            - ecs:UpdateService
            - ecs:RegisterTaskDefinition
            - ecs:DeregisterTaskDefinition
            - ecs:CreateService
            - iam:*
            - logs:CreateLogGroup
            - logs:CreateLogStream
            - logs:DescribeLogGroups
            - logs:DeleteLogGroup
            - logs:PutRetentionPolicy

  CodeBuildServiceRole:
    Type: "AWS::IAM::Role"
    Properties:
      Path: "/"
      AssumeRolePolicyDocument:
        Statement:
        - Effect: Allow
          Principal:
            Service:
            - codebuild.amazonaws.com
          Action:
          - sts:AssumeRole
      Policies:
      - PolicyName: CodeBuildAccess
        PolicyDocument:
          Version: '2012-10-17'
          Statement:
          - Resource: "*"
            Effect: Allow
            Action:
            - logs:CreateLogGroup
            - logs:CreateLogStream
            - logs:PutLogEvents
            - ecr:GetAuthorizationToken
          - Resource: !Sub arn:aws:s3:::${ArtifactBucket}/*
            Effect: Allow
            Action:
            - s3:GetObject
            - s3:PutObject
            - s3:GetObjectVersion
          - Resource: !Sub arn:aws:ecr:${AWS::Region}:${AWS::AccountId}:repository/${Repository}
            Effect: Allow
            Action:
            - ecr:GetDownloadUrlForLayer
            - ecr:BatchGetImage
            - ecr:BatchCheckLayerAvailability
            - ecr:PutImage
            - ecr:InitiateLayerUpload
            - ecr:UploadLayerPart
            - ecr:CompleteLayerUpload

  CodePipelineServiceRole:
    Type: "AWS::IAM::Role"
    Properties:
      Path: "/"
      AssumeRolePolicyDocument:
        Statement:
        - Effect: Allow
          Principal:
            Service:
            - codepipeline.amazonaws.com
          Action:
          - sts:AssumeRole
      Policies:
      - PolicyName: CodePipelineAccess
        PolicyDocument:
          Version: '2012-10-17'
          Statement:
          - Resource:
            - !Sub arn:aws:s3:::${ArtifactBucket}/*
            Effect: Allow
            Action:
            - s3:PutObject
            - s3:GetObject
            - s3:GetObjectVersion
            - s3:GetBucketVersioning
          - Resource: "*"
            Effect: Allow
            Action:
            - codebuild:StartBuild
            - codebuild:BatchGetBuilds
            - cloudformation:CreateStack
            - cloudformation:DeleteStack
            - cloudformation:DescribeStack*
            - cloudformation:UpdateStack
            - iam:PassRole

  ArtifactBucket:
    Type: "AWS::S3::Bucket"

  CodeBuildProject:
    Type: "AWS::CodeBuild::Project"
    Properties:
      Artifacts:
        Location:
          Ref: ArtifactBucket
        Type: S3
      Source:
        Location: !Sub https://github.com/ticklesource/${RepoName}.git
        Type: GITHUB
      Environment:
        ComputeType: BUILD_GENERAL1_LARGE
        Image: aws/codebuild/docker:17.09.0
        Type: LINUX_CONTAINER
        # PrivilegedMode: true
        EnvironmentVariables:
        - Name: AWS_DEFAULT_REGION
          Value: !Ref AWS::Region
        - Name: REPOSITORY_URI
          Value: !Sub "${AWS::AccountId}.dkr.ecr.${AWS::Region}.amazonaws.com/${Repository}"
      Name: !Ref ApplicationName
      ServiceRole: !Ref CodeBuildServiceRole

  Pipeline:
    Type: "AWS::CodePipeline::Pipeline"
    Properties:
      Name: !Ref ApplicationName
      RoleArn:
        !GetAtt
        - CodePipelineServiceRole
        - Arn
      ArtifactStore:
        Type: S3
        Location: !Ref ArtifactBucket
      Stages:
      - Name: Source
        Actions:
        - Name: Source
          ActionTypeId:
            Category: Source
            Owner: ThirdParty
            Version: 1
            Provider: GitHub
          Configuration:
            Owner: ktei
            Repo: !Ref RepoName
            Branch: develop
            OAuthToken: your_github_oauth_token # create your own token
          OutputArtifacts:
          - Name: Source
          RunOrder: 1
      - Name: Build
        Actions:
        - Name: Build
          ActionTypeId:
            Category: Build
            Owner: AWS
            Version: 1
            Provider: CodeBuild
          Configuration:
            ProjectName: !Ref CodeBuildProject
          InputArtifacts:
          - Name: Source
          OutputArtifacts:
          - Name: BuildOutput
      - Name: Deploy
        Actions:
        - Name: Deploy
          ActionTypeId:
            Category: Deploy
            Owner: AWS
            Version: 1
            Provider: CloudFormation
          Configuration:
            ChangeSetName: Deploy
            ActionMode: CREATE_UPDATE
            StackName: !Sub "app-${ApplicationName}"
            Capabilities: CAPABILITY_NAMED_IAM
            TemplatePath: BuildOutput::cfn/deploy.yml
            RoleArn: !GetAtt [ CloudFormationExecutionRole, Arn ]
            ParameterOverrides:
              Fn::Sub: |-
                {
                  "BaseImageName": "${AWS::AccountId}.dkr.ecr.${AWS::Region}.amazonaws.com/${Repository}",
                  "ImageTag": {
                    "Fn::GetParam": [
                      "BuildOutput",
                      "build.json",
                      "tag"
                    ]
                  }
                }
          InputArtifacts:
          - Name: BuildOutput
Don’t forget Route53
After you build CICD, it’ll start the first build and deployment automatically. If it succeeds, you can access your website through https://your-aws-load-balancer-dns-name.aws.com/app. But this URL is too long to remember and most importantly, you won’t have SSL/TLS certificate to protect the ALB domain. However, if you have bought a domain then you should have at least one hosted zone in Route53 service. Go to that service page and create a new record set, where you should define an A record, for instance www.mydomain.io, pointing to your ALB domain name. Also, you need to use AWS Certificate Manager service to create an SSL/TLS certificate to protect *.mydomain.io. With all these set up, you can then browse https://www.mydomain.io/app.
Conclusion
From Part 1 to this Part 2, I’ve showed you how I utilized AWS resources and CloudFomration to build a secure and highly available .NET core website running on AWS ECS within my own VPC. I believe that there’s a lot to digest here if you’re absolutely a beginner on AWS and .NET core. However, I still hope that this article will at least give you some ideas and maybe inspire you in areas such as programming, cloud or DevOps. I enjoyed the journey of doing so and I hope you will too!